

Bird at 2 O’Clock! How Birders Help Each Other Find Birds
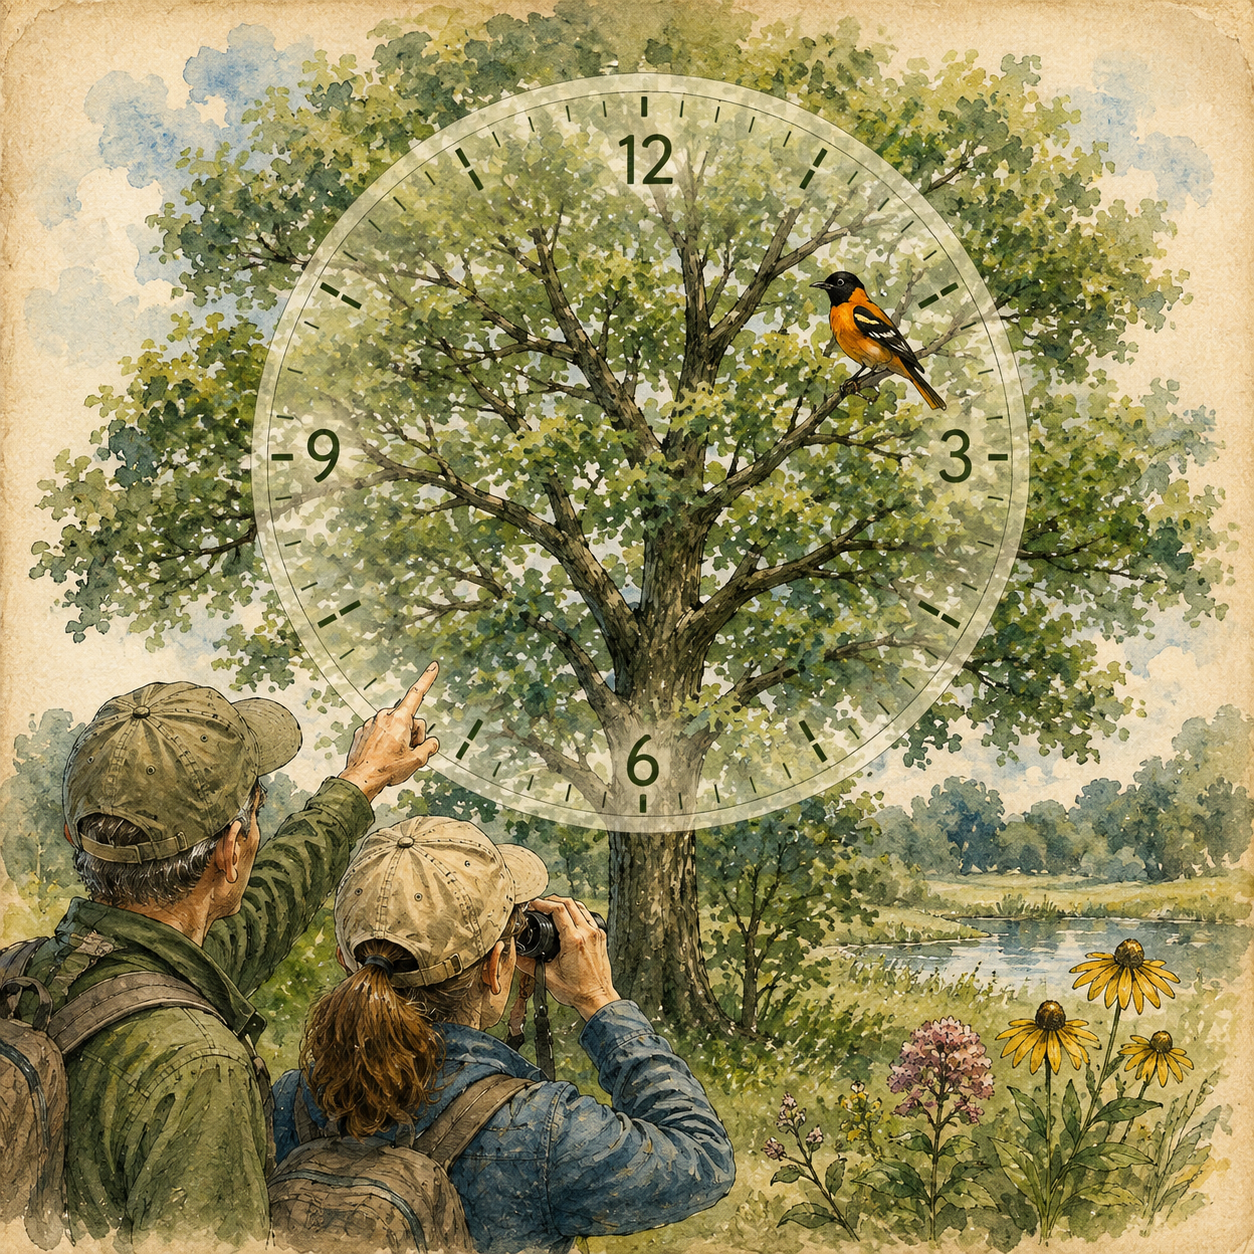
You’re standing with a group of birders when somebody suddenly says:
“Bird at 2 o’clock! Tallest tree. About three feet in from the outer edge.”
Binoculars go up.
People start looking.
And if you’re a beginning birder, you may be thinking:
Two o’clock from what? Which tree? Three feet from where?
Welcome to one of those little pieces of birding language that sounds perfectly normal once you’ve been birding awhile—and slightly ridiculous before you learn what everyone is talking about.
The good news is that it’s remarkably simple.
Even better, learning how to describe where a bird is located is one of those small skills that can make you a better birder surprisingly quickly.
It isn’t really about knowing more birds. It’s about learning to see the landscape the way birders see it and communicate what you see clearly enough that someone else can find the bird too.
And the imaginary clock face is one of our favorite tools.
Why Finding the Bird Can Be Harder Than Identifying It
Beginning birders often assume that birding is mostly about identification.
What color is the bird?
What shape is the bill?
Does it have wing bars?
What species is it?
But before any of those questions matter, you have to accomplish something much more basic:
You have to find the bird.
That isn't always easy.
A tiny warbler can disappear into thousands of green leaves. A sparrow may be sitting among dozens of nearly identical branches. A hawk soaring against a huge blue sky can be surprisingly difficult for another person to locate even though you can see it perfectly.
That's when you discover one of the great frustrations of birding:
Pointing doesn't work very well.
“There!”
“Where?”
“Right there!”
“Where?”
“Look where I’m looking!”
“Which tree?”
“The big one!”
They're all big.
Every birder has participated in some version of this conversation.
Experienced birders solve the problem by giving each other a series of quick reference points.
And one of the fastest is the imaginary clock.
How the Birding Clock Face Works
Imagine a giant clock face on a horizontal plane in front of you.
Straight ahead is 12 o’clock.
Directly to your right is 3 o’clock.
Behind you is 6 o’clock.
Directly to your left is 9 o’clock.
Everything else falls somewhere between those points.
So if someone says:
“Hawk at 1 o’clock.”
you immediately know to look forward and slightly to the right.
If someone says:
“Three geese at 10 o’clock.”
you look forward and to the left.
This works especially well with birds flying overhead because there may not be many other landmarks available.
But birders also use the clock face within an object.
Imagine everyone is looking at the same large tree.
Now the tree itself becomes your clock face.
A bird near the upper right portion of the tree might be at 2 o’clock.
A bird low on the left side might be at 7 or 8 o’clock.
That simple bit of information can eliminate a tremendous amount of searching.
Instead of:
“There’s a warbler in the oak.”
you can say:
“Warbler at about 2 o’clock in the oak.”
Much better.
But we can make it better still.
Start With Something Everyone Can Find
The clock system works only if everyone understands the starting point.
This is where good birding directions become a little like giving someone directions while driving.
You wouldn't say:
“Turn left after that tree.”
You'd give them a landmark they can recognize.
Birders do the same thing.
Look around for an obvious feature:
the tallest tree
a dead snag
a telephone pole
a fence post
a large horizontal branch
a patch of red flowers
a bare branch sticking above the canopy
the only evergreen among deciduous trees
Start there.
For example:
“Find the tallest dead tree along the creek.”
Give everyone a second to find it.
Then:
“Now look at about 10 o’clock, near the outer branches.”
Suddenly a bird that seemed nearly impossible to describe has become much easier to locate.
Add Height
Another extremely useful piece of information is how high the bird is.
You don't need to estimate that a bird is exactly 27 feet above the ground.
Keep it simple.
Birders commonly use descriptions such as:
low, halfway up, three-quarters up, near the top, or at the very top.
So instead of saying:
“There's a woodpecker in that tree.”
try:
“Woodpecker in the dead tree at 10 o’clock, about halfway out on the branch.”
Now you've given the other birder three pieces of information:
which tree + which direction + which height.
That's a very good birding direction.
Use the Outside Edge of a Tree
Dense foliage creates another problem.
Suppose you've found the correct tree and you're looking at the correct height, but there are hundreds of branches and leaves.
One of the best tricks is to use the outer edge of the tree as another reference point.
You might say:
“About three feet in from the right edge.”
Or:
“Just inside the left edge of the foliage.”
Or:
“Near the top, about two feet down from the highest branch.”
This is especially helpful for birds sitting quietly inside foliage.
A complete description might sound like this:
“The bird is at 2 o’clock in the tallest tree, about three feet in from the outer edge.”
That's excellent birding communication.
It sounds a little complicated when you first read it.
In the field, it takes about three seconds to say.
Branches Make Wonderful Road Maps
Birders also learn to use the structure of a tree.
A distinctive branch can become a highway leading directly to the bird.
You may hear:
“Find the big horizontal branch halfway up the tree. Follow it to the right. The bird is just above the fork.”
This technique is incredibly effective.
Instead of searching the entire tree, you're giving someone a route to follow.
Find the trunk.
Find the branch.
Follow the branch.
Find the fork.
There's the bird.
Once you begin practicing this, you'll discover that trees are full of useful landmarks.
Forks.
Broken limbs.
Bare branches.
Clusters of dead leaves.
V-shaped openings.
And birds often sit near exactly those kinds of features.
Tell People What the Bird Is Doing
Movement is another great clue.
Sometimes the easiest way to find a bird isn't describing where it is.
It's describing what it's doing.
“Look for the bird flicking its tail.”
“It's climbing the trunk.”
“It's moving left along the branch away from the trunk.”
“It's hovering near the flowers.”
“It's flying toward us.”
A moving bird can actually be easier to find than a stationary one—provided everyone knows where to begin looking.
Combine location and movement and your directions become even better:
“Small bird at 9 o’clock, halfway up the shrub. It's moving toward the left edge.”
That's the kind of instruction that gets binoculars onto birds.
Birds in the Sky Require Slightly Different Directions
The clock face becomes especially useful when you're watching birds in flight.
Imagine someone spots a kettle of hawks high overhead.
Pointing at the sky isn't particularly helpful.
Instead:
“Hawks at 11 o’clock, very high.”
Everyone immediately knows where to begin scanning.
Then you can add another landmark:
“They're drifting toward the large white cloud.”
Or:
“They're just above the ridge.”
Or:
“Look above the radio tower and slightly right.”
Again, you're creating a trail of clues.
The goal isn't to describe the bird beautifully.
The goal is to get everyone looking at the same piece of sky.
Sometimes “Where” Is More Important Than “What”
There's another reason I think beginning birders should practice this skill.
It teaches you to pay attention to where birds are within their habitat.
That turns out to be extremely useful for identification.
Is the bird:
on the ground?
inside a shrub?
clinging to a tree trunk?
at the very top of a tree?
on an exposed fence post?
high in the canopy?
walking along the shoreline?
hovering over water?
Where a bird chooses to spend its time is often an important clue to what it is.
So when you learn to describe a bird's location accurately, you're also training yourself to notice habitat, behavior and position.
Those are exactly the kinds of clues experienced birders use.
Personal note: The first time I saw a Snowy Owl in the wild was in extreme eastern Colorado. We drove hours from home on the chance to see this bird & reached the appointed location - a featureless prairie in January in Colorado. To say it was cold was an understatement. We got our lifer look - unrewarding as it was - through the heat shimmer about 100 yards away of a Snowy Owl past the second fence line 3 fence posts to the right of the broken one then back at least 20 more yards.
Fast forward to several Februarys ago when we again got in the car to drive out west of our home now near Austin Texas. We got to Odessa and went to the location of another Snowy that was very far out of his winter range. We searched a hotel construction sight for 30+ minutes looking for that bird. Under things, on the ground, beneath bushes - no luck. Skip glanced at the hotel under construction out of frustration mostly. On the edge of the roof of this hotel sat a gorgeous white owl leaning way over trying to see what WE were looking for. Wahoo!
Practice Even When You're Birding Alone
You don't need to wait for a group bird walk to practice.
The next time you're birding alone and spot a bird, pretend you're trying to show it to someone standing beside you.
How would you describe its location?
Instead of thinking:
There's a chickadee.
try:
“Chickadee at 1 o’clock in the small tree, about halfway up and near the outer branches.”
It may feel silly at first.
That's okay.
You're teaching your brain to quickly identify landmarks, direction and position.
After a while, you won't have to think about it.
You'll simply do it.
Keep Your Directions Short
There's one final trick.
Don't give someone a paragraph.
Birds move.
By the time you've finished explaining the location, your bird may be three trees away.
Start with the biggest, easiest landmark.
Then narrow it down.
“Tall dead tree.”
Pause.
“About halfway up.”
Pause.
“Big branch going right.”
Pause.
“Bird just above the fork.”
That gives the other birder time to follow you.
If the bird moves, update the directions.
“Moving left.”
“Now near the trunk.”
“Dropped lower.”
“Circling west, wait til it banks.”
Good birding directions are almost like a little conversation between two sets of eyes.
This Is One of Those Skills You'll Use Forever
Learning the clock face isn't flashy.
You won't find a special page for it in most field guides, and nobody is going to hand you a certificate when you master it.
But it belongs in the toolbox of every beginning birder.
Because birding isn't just about knowing bird names.
It's about finding birds, watching birds and sharing birds with other people.
Learning to say:
“Bird at 2 o’clock in the tallest tree, about three feet in from the outer edge.”
means you've learned much more than an odd bit of birding vocabulary.
You've learned how to turn what you see into directions another birder can follow.
And when someone beside you raises their binoculars and says,
“Got it!”
you'll understand why birders have been using these quick, wonderfully simple directions for years.
That's one more little step from simply looking for birds to thinking like a birder.
Now read our Birding for Beginners series starting with Part 1
